You need the best microscope magnification range—typically 40x to 1000x—to view specimens with sharpness and detail. Choosing this range helps you avoid blurry images and makes focusing easier. Studies show that higher magnification often reduces image quality and complicates focusing.
|
Magnification Range |
Recommended Use |
Notes |
|---|---|---|
|
100x–400x |
Plant/Animal Cells |
Ideal for observing details without over-zooming |
|
600x–1000x |
Bacteria/Small Microorganisms |
Better suited for smaller specimens |
|
40x–400x |
Tissue Samples |
Ensures sharp images with good detail |
|
10x–50x |
Metal/Mineral Samples |
Sufficient for maintaining depth perception |
|
100x–250x |
Beginners/Hobbyists |
Clear images without advanced setups |
Best Microscope Magnification Range
Optimal Range for Most Users
You need to know the best microscope magnification range to get clear and detailed images. For most users, the range from 40x to 1000x covers almost every common application. This range works well for students, hobbyists, and professionals. You can use it to study plant cells, animal tissues, bacteria, and even small mineral samples. The microscope magnification chart below shows how different objectives and eyepieces combine to give you the total magnification you need:
|
Objective Lens Type |
Magnification Range |
Typical Uses |
|---|---|---|
|
High-power objective lens |
40x to 100x |
Detailed examination of tiny structures, studying individual cells, or small particles. |
|
Oil-immersion objective lens |
100x or more |
Examining microscopic structures and observing details at the cellular level. |
You can see that the right microscope magnification depends on the type of specimen and the detail you want to observe. Most compound microscopes use a combination of objective lens magnification and eyepiece power to reach the ideal magnification for your needs.
The following microscope magnification chart highlights how different types of microscopes compare in their magnification ranges and use cases:
|
Microscope Type |
Magnification Range |
Use Cases |
|---|---|---|
|
Compound Microscopes |
40x to 2000x (with oil) |
Observing minute details, biological samples |
|
Digital Microscopes |
Up to 1000x (commonly 400x) |
Viewing microscopic materials in labs |
|
Stereo Microscopes |
20-80x |
Ideal for collectors and examining solid objects |
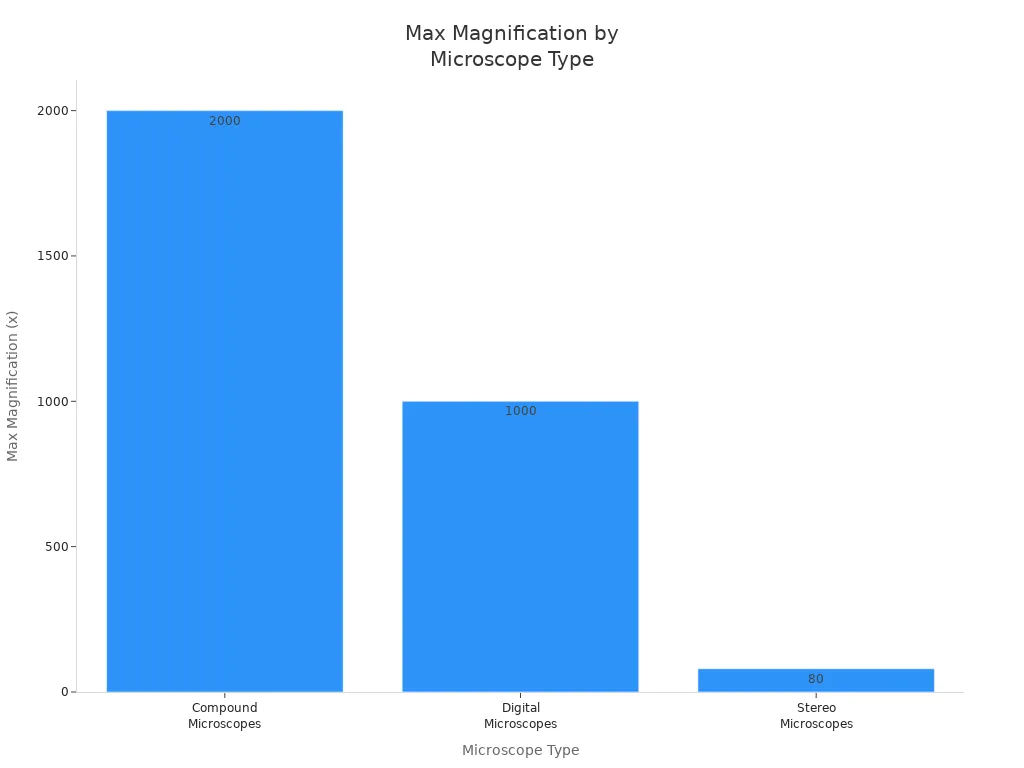
You will find that the best microscope magnification range of 40x to 1000x fits most educational and research needs. This range allows you to see cell structures, blood cells, and even single-celled organisms. The microscope magnification chart also shows that higher magnification is not always better for every specimen.
Why This Range Works
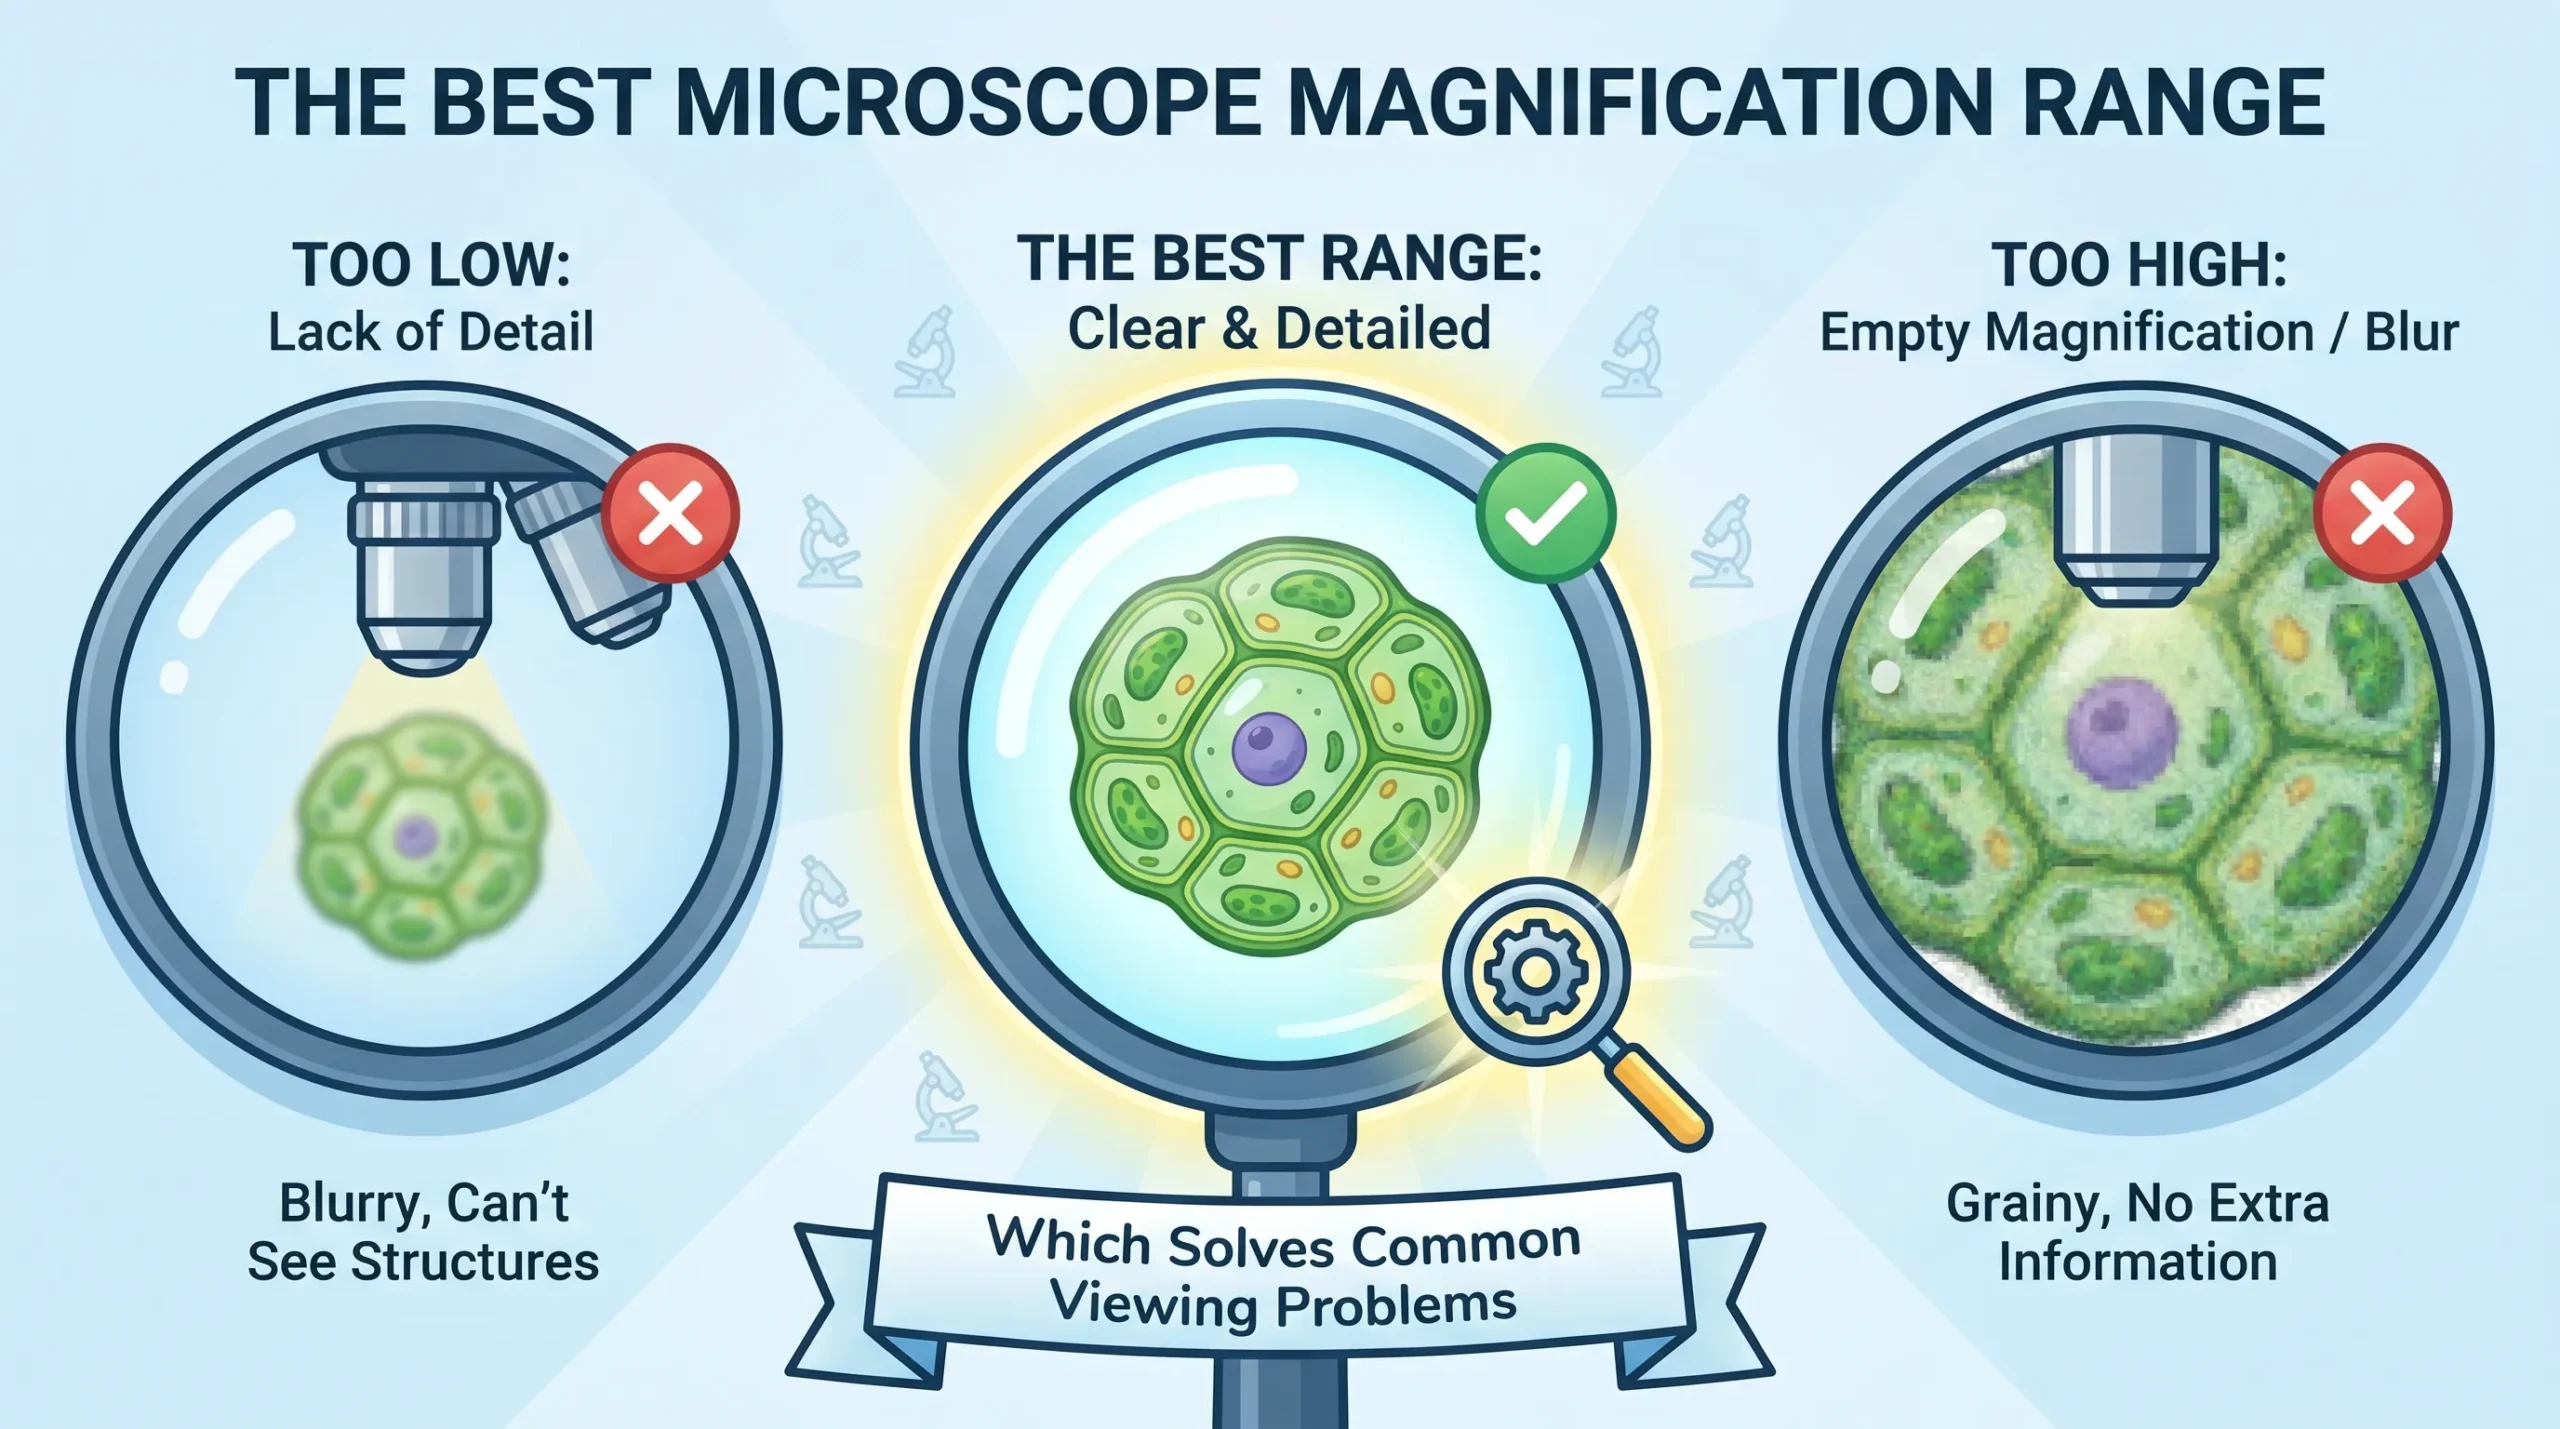
You might wonder why the best microscope magnification range stops at 1000x. The answer lies in how magnification, resolution, and image quality work together. Magnification makes objects appear larger, but it does not always reveal more detail. The real limit comes from the microscope’s numerical aperture and the wavelength of light. If you go beyond the ideal magnification, you will not see more detail—instead, the image becomes blurry or distorted.
Here is what happens when you use the right range:
-
You get enough detail to study cells and microorganisms without losing clarity.
-
You avoid the common mistake of thinking that higher magnification always means better images.
-
You keep the field of view and brightness at a level that makes it easy to find and focus on your specimen.
The following microscope magnification chart shows why 40x to 1000x is the optimal range for most users:
|
Magnification Range |
Application |
Description |
|---|---|---|
|
Education |
Essential for biology students to study cell structure and tiny organisms. |
|
|
40x – 1000x |
Medical Research |
Used to observe details of plant cells, bone marrow, blood cells, and single-celled organisms. |
|
400x and above |
Cell Studies |
Necessary for studying cells and their structures. |
When you try to use magnification beyond 1000x, you run into several problems:
-
The image may appear as fuzzy discs with diffraction rings, not sharp details.
-
Only a thin section of your specimen stays in focus, making it hard to observe three-dimensional structures.
-
The microscope cannot resolve fine details because of the limits set by light and lens quality.
You should always use the best microscope magnification range to avoid these issues. This approach gives you the clearest images and the easiest focusing experience. The microscope magnification chart helps you choose the right settings for your specimen, so you get the most out of your microscope.
Solving Viewing Problems
Reducing Blurry Images
You often see blurry images when you use a microscope outside the best microscope magnification range. This happens because higher magnification can exceed the resolving power of your microscope. You lose clarity and detail. The microscope magnification chart shows that excessive magnification narrows the field of view and reduces brightness.
You also face issues like intermittent focus errors, stage drift, and contrast errors:
-
Intermittent focus errors occur due to vibrations at high magnification.
-
Stage drift results from the weight of the stage, causing loss of clarity.
-
Poor contrast appears when the condenser aperture is too wide, leading to flare and reduced image quality.
The best microscope magnification range helps you avoid these problems. You get sharp images and maintain a good microscope magnification for clear viewing.
Getting Enough Detail
You need enough detail to study biological specimens. The microscope magnification chart demonstrates that the optimal range reveals fine structural details. High magnification improves the signal-to-noise ratio, making intricate features visible. However, if you go beyond the recommended range, you risk losing signal quality and obscuring details. The total magnification should match your specimen type. The microscope magnification chart guides you to select the right settings for maximum detail.
-
Optimal magnification reveals fine structures.
-
Excessive magnification reduces signal quality.
-
The microscope magnification chart helps you choose the best settings.
Easier Focusing
You find focusing easier when you use the recommended magnification range. The microscope magnification chart shows that higher magnification magnifies errors and narrows the field of view. You may experience mirage effects, wind interference, and instability.
The table below summarizes common focusing issues:
|
Focusing Issue |
Description |
|---|---|
|
Increases in Errors |
High magnification magnifies setup errors and instability. |
|
Mirage & Wind |
Excessive magnification complicates adjustments for mirage and wind. |
|
Size/Weight |
Larger, heavier scopes affect portability and stability. |
|
Field of View |
Narrower field of view hinders target acquisition and causes disorientation. |
The microscope magnification chart helps you select a range that keeps focusing simple and reliable.
Choosing and Using the Right Magnification
Match Magnification to Specimen
You need to match your magnification to the specimen for the best results. The microscope magnification chart helps you select the right objective lens based on the size and type of your sample. For example, large tissue sections require lower magnification, while bacteria need higher settings. The numerical aperture of your lens determines how much detail you can see. If you want to observe fine structures, you must consider both the magnification and the resolution. The microscope magnification chart also reminds you to balance field of view and detail.
Good lighting and proper lens selection make a big difference in clarity.
-
Choose the objective lens based on specimen size.
-
Use the microscope magnification chart to check the best range for your sample.
-
Adjust lighting to enhance image quality.
-
Consider the numerical aperture for sharpness.
Avoid Over- and Under-Magnification
You should avoid both over-magnification and under-magnification. The microscope magnification chart shows that too much magnification can cause blurry images and make focusing difficult. Over-magnification increases optical errors and reduces depth of field, making it hard to see three-dimensional structures. Under-magnification does not reveal enough detail for small features. The right microscope magnification ensures you see what you need without distortion.
Practical Tips for Best Results
You can follow these tips to get the most from your microscope:
-
Begin with the lowest setting on the microscope magnification chart to locate your specimen.
-
Center your sample before increasing magnification.
-
Use proper slide preparation to avoid bubbles.
-
Adjust lighting and focus for each step.
-
Calibrate your microscope regularly for accurate measurements.
-
Remember that total magnification depends on both the eyepiece and objective lens.
The microscope magnification chart acts as your guide for every observation. When you use it, you achieve clear images and reliable results every time you use your microscope.
You solve common viewing problems when you use the best microscope magnification range. Matching total magnification to your needs gives you clear, comfortable microscope viewing. Educational guides recommend multiple options and good optics for better results:

