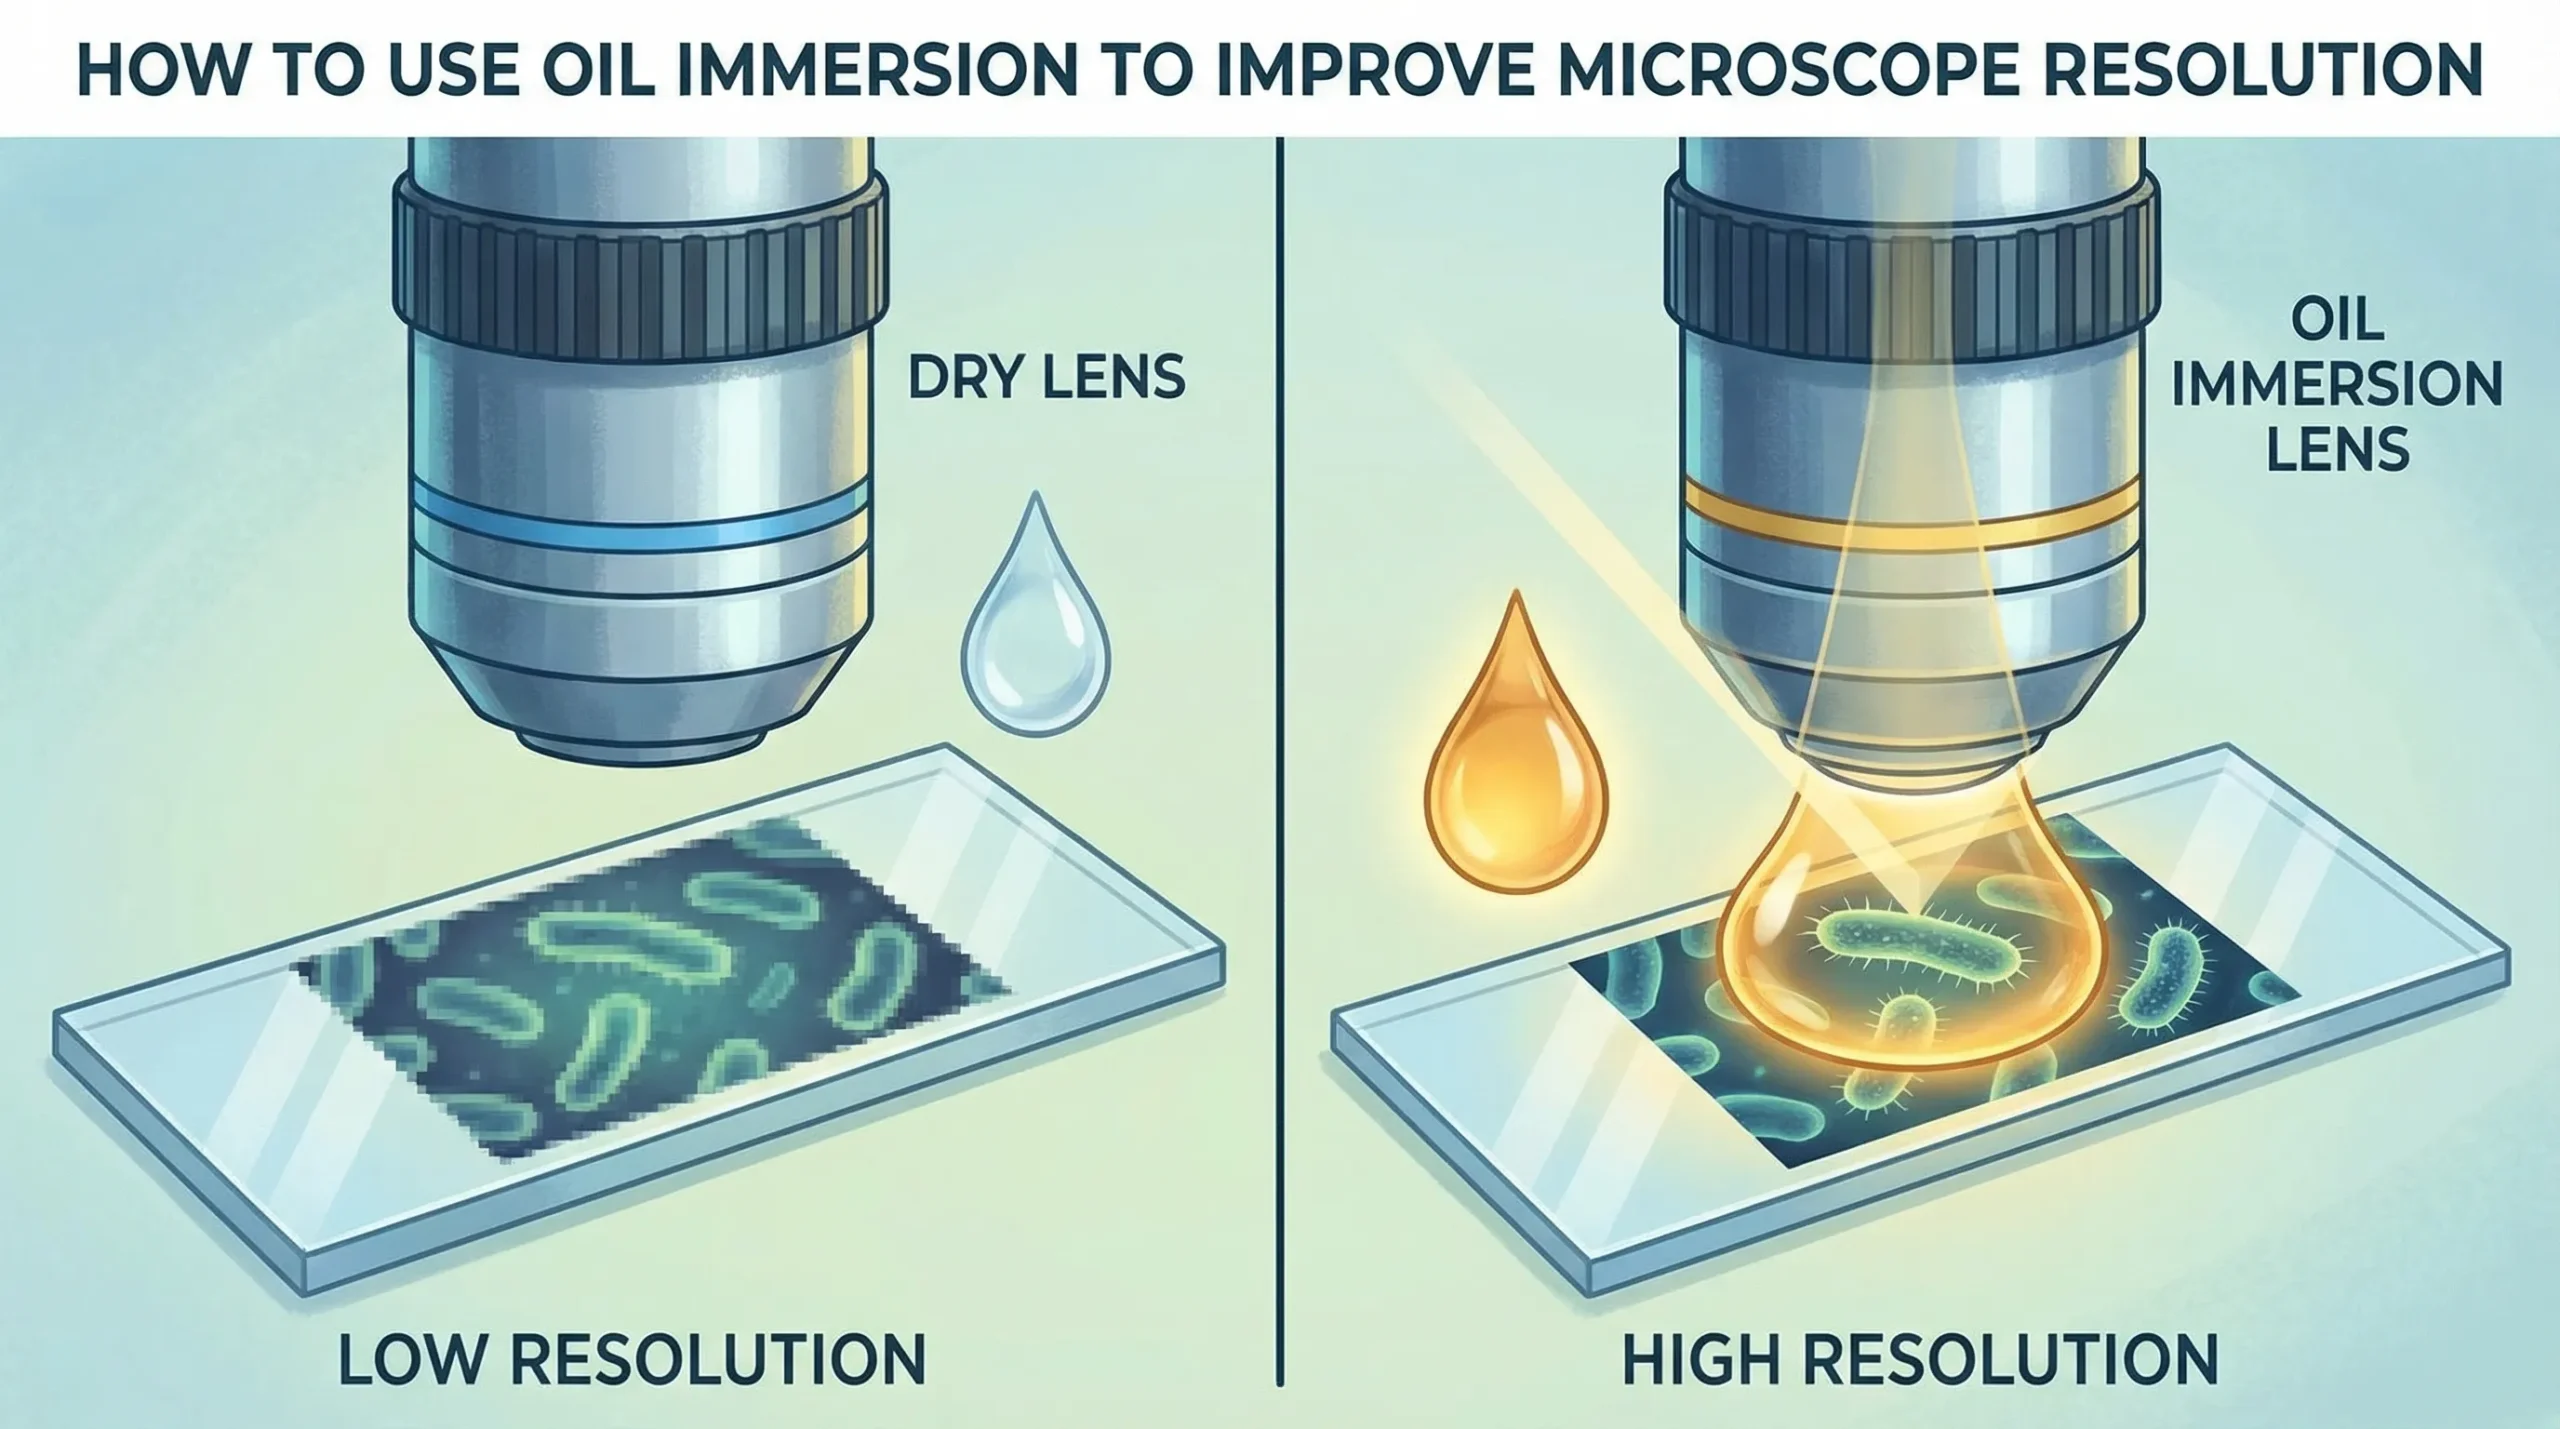
Oil immersion is a powerful technique that enhances the resolution of your microscope, making it ideal for observing intricate specimen details. This method uses a special immersion oil placed between the objective lens and the slide. The oil reduces light refraction, allowing more light to pass into the lens. When the refractive index of the oil matches that of the glass slide, it minimizes light scattering, resulting in sharper images.
To understand how to improve microscope resolution, it’s important to note that a higher numerical aperture (NA) is crucial for achieving the best results. Oil immersion dramatically increases NA, enabling your microscope to capture finer details.
Studies show enhanced localization precision and up to a 2.5-fold improvement in resolution when using advanced oil immersion systems. This makes oil immersion an indispensable tool for high-magnification microscopy, whether you’re working in research, education, or clinical diagnostics.
How Oil Immersion Helps Increase Resolution
The role of immersion oil in reducing light refraction
When you observe a specimen under a microscope, light travels through different materials like air, glass, and the specimen itself. Each material has a unique refractive index, which determines how much it bends light. Without immersion oil, light rays scatter as they pass through the air gap between the slide and the objective lens. This scattering reduces the amount of light entering the lens, leading to a blurry or low-quality image.
Immersion oil solves this problem by filling the gap between the slide and the lens. Its refractive index, typically around 1.51, closely matches that of glass coverslips. This match allows light rays to pass through the specimen and into the lens without significant refraction. As a result, you get a sharper and clearer image.
Immersion oil minimizes spherical aberration, ensuring that light rays focus accurately on the specimen.
-
Benefits of immersion oil:
-
Reduces light scattering.
-
Corrects chromatic and spherical aberrations.
-
Increases the microscope’s light-gathering ability.
-
How matching the refractive index improves image clarity
Matching the refractive index of the immersion oil to the glass slide is crucial for achieving high-resolution images. When the refractive indices align, light travels through the optical path without deviation. This alignment ensures that even oblique light rays, which carry fine details of the specimen, reach the objective lens.
Research supports this principle. For example, a study published in Optica introduced advanced optical corrections that improve clarity by reducing spherical aberrations. Similarly, findings in PLOS One demonstrated that specific immersion media enhance axial resolution and imaging depth in biological specimens.
The above studies highlight the importance of refractive index matching for obtaining detailed and accurate images.
|
Study |
Key Findings |
|---|---|
|
Optica |
Improved optical corrections reduce spherical aberrations. |
|
Elife |
Enhanced image quality in live specimens by minimizing light distortion. |
|
PLOS One |
Increased axial resolution in fixed tissue samples using optimized media. |
The connection between numerical aperture and resolution
The numerical aperture (NA) of a microscope lens directly affects its ability to increase resolution. NA measures the lens’s capacity to gather light and resolve fine details. The formula for resolution, approximately λ/(2 NA), shows that higher NA values lead to better resolution.
Immersion oil plays a key role here by increasing the NA of high-magnification objectives.
When you use immersion oil, the lens captures more light from the specimen. This increased light-gathering ability allows you to visualize smaller structures with greater clarity. For instance, high-NA lenses combined with oil immersion can resolve details that are otherwise invisible under dry objectives.
This makes oil immersion essential for applications requiring precise imaging, such as cellular biology and pathology.
Step-by-Step Guide on How to Improve Microscope Resolution with Oil Immersion
Preparing your microscope and slide for oil immersion
Proper preparation ensures you achieve the best results when using oil immersion. Start by cleaning the microscope’s objective lens and stage to remove any dust or debris. A clean surface prevents contamination and ensures accurate imaging. Next, prepare your slide. If you’re working with a wet mount, place the specimen in a liquid medium like iodine to enhance visibility.
For histological samples, follow standard procedures: fix the specimen, dehydrate it, embed it in paraffin, section it, stain it, and mount it on a slide.
Always use a cover slip to hold the specimen in place and protect it from damage.
Before applying oil, ensure the microscope is set to the correct magnification. Rotate the oil immersion objective into position without oil to confirm the specimen’s location. This step prevents unnecessary adjustments later and saves time during the imaging process.
Applying immersion oil correctly to the slide
Applying immersion oil properly is crucial for achieving high-resolution images. Begin by placing a small droplet of immersion oil on the cover slip directly above the area of interest. Use an eyedropper or a lint-free applicator to avoid overapplying. Next, add a second droplet of oil to the front lens of the oil immersion objective. This creates a continuous optical path between the lens and the slide, reducing light refraction.
Slowly lower the objective lens into the oil pool using the coarse adjustment knob. Ensure the lens makes contact with the oil without pressing too hard against the slide. Proper application minimizes air gaps and ensures light travels efficiently through the optical system.
Adjusting focus and fine-tuning for the best resolution
Once the oil is applied, focus the microscope to capture the clearest image. Start with the coarse adjustment knob to bring the specimen into view. Once you see the specimen, switch to the fine adjustment knob for precise focusing. Make small, incremental adjustments to sharpen the image and reveal fine details.
Quantitative adjustments can help optimize resolution. Slowly lower the oil objective into the oil pool on the cover slip. Use the coarse adjustment to bring the specimen into focus until details become visible.
Then, fine-tune the focus to achieve maximum clarity. This method ensures you capture the highest level of detail possible.
🔖 Tip: If the image appears blurry or distorted, check for air bubbles in the oil. Remove them by gently rotating the objective lens or reapplying the oil.
Cleaning the objective lens and slide after use.
Proper cleaning of the objective lens and slide after using oil immersion is essential for maintaining your microscope’s performance and ensuring accurate results. Residual oil can degrade the optical quality and even damage the microscope if left unattended. Follow these steps to clean your equipment effectively and protect your investment.
Step 1: Remove the immersion oil from the objective lens
Start by gently wiping the objective lens with a lint-free lens paper or a microfiber cloth. Use a circular motion to lift the oil without spreading it further. If the oil has dried or is difficult to remove, apply a small amount of lens cleaning solution to the paper. Avoid using excessive liquid, as it can seep into the lens housing and cause damage.
Step 2: Clean the slide and coverslip
Carefully remove the slide from the stage and wipe off the oil using a soft, lint-free cloth. If the slide is reusable, rinse it with warm water and a mild detergent to remove any remaining oil. Dry it thoroughly before storing it. For disposable slides, discard them responsibly to avoid contamination.
Step 3: Inspect for residue
After cleaning, inspect both the objective lens and the slide under a bright light. Look for any streaks or smudges that might interfere with future observations. If you notice any residue, repeat the cleaning process until the surfaces are completely clear.
Step 4: Store your microscope properly
Once the cleaning is complete, store your microscope in a dust-free environment. Use a protective cover to shield it from dirt and debris. Proper storage prevents contamination and reduces the need for frequent cleaning.
Why proper cleaning matters
Neglecting to clean your microscope after using oil immersion can lead to several issues. Residual oil can attract dust and debris, which may scratch the lens or obscure the view. Over time, this can degrade the optical performance and shorten the lifespan of your equipment. Regular cleaning ensures that your microscope remains in optimal condition, providing clear and accurate images for years to come.
|
Benefit/Consequence |
Description |
|---|---|
|
Proper maintenance ensures production of high-contrast images, essential for accurate observations. |
|
|
Prevention of Optical Degradation |
Immediate removal of immersion oil prevents degradation of optical performance over time. |
|
Extended Instrument Lifespan |
Regular maintenance can allow the microscope to outlive several generations of users. |
|
Avoidance of Mechanical Damage |
Proper cleaning prevents oil from penetrating gears and mechanisms, avoiding irreversible damage. |
|
Improved Productivity |
Correct operation and maintenance lead to reliable image quality and increased productivity. |
Taking the time to clean your microscope after each use not only protects your equipment but also enhances your productivity. A well-maintained microscope delivers consistent, high-quality results, making it a valuable tool for research, education, and clinical applications.
Note: Always refer to your microscope’s user manual for specific cleaning instructions. Different models may have unique requirements for maintenance.
The Science Behind Obtaining the Best Image Quality
How numerical aperture impacts resolution
The numerical aperture (NA) of a microscope lens plays a critical role in determining the achievable resolution of your images. NA measures the lens’s ability to gather light and resolve fine details. A higher NA allows the lens to capture more light, which directly improves the clarity and sharpness of the image. This is especially important when working with high-magnification objectives, where even small improvements in NA can lead to significant gains in resolution.
Studies show that increasing the NA from 0.7 to 0.8 results in a 2.1 times increase in information density. In comparison, changing the detection wavelength from 0.8 to 0.7 μm only yields a 1.5 times increase in information density. This demonstrates that NA has a more substantial impact on resolution than the wavelength of light. By using oil immersion, you can maximize the NA of your objective lens, enabling you to observe intricate specimen details that would otherwise remain hidden.
Tip: Always check the NA value of your objective lens before starting your observations. Higher NA lenses are better suited for applications requiring detailed imaging.
The effect of refractive index on light transmission
The refractive index of a material determines how light travels through it. When light passes from one medium to another with a different refractive index, it bends or refracts. This bending can cause light to scatter, reducing the amount of light that reaches the objective lens and lowering the resolution of your image. Matching the refractive index of the immersion oil to that of the glass slide minimizes this scattering, ensuring that light travels efficiently through the optical path.
For example, systematic studies have shown that variations in refractive index can significantly impact light transmission. Measurements using laser interferometric microscopy reveal that changes in refractive index correlate with optical thickness variations, which can affect image clarity. By using immersion oil with a refractive index close to 1.515 (the same as glass), you create a continuous optical path that enhances light transmission and improves image quality.
|
Factor |
Impact on Light Transmission |
|---|---|
|
Refractive Index Variation |
Causes light scattering, reducing image clarity. |
|
Optical Thickness Variation |
Affects focus and resolution, especially at high magnifications. |
|
Ion Energy and Fluence |
Influences refractive index changes in experimental setups. |
This alignment of refractive indices is essential for achieving the best possible resolution in microscopy. It ensures that even the faintest details of your specimen are captured with precision.
Why oil immersion is essential for high-magnification objectives
High-magnification objectives require a medium that supports their ability to gather light and resolve fine details. Without oil immersion, the air gap between the slide and the lens causes significant light refraction, reducing the amount of light entering the lens. This limits the resolution and contrast of your images, making it difficult to observe small structures.
Oil immersion addresses this issue by filling the gap with a medium that matches the refractive index of the glass. This creates a seamless optical path, allowing more light to enter the objective lens. The refractive index of immersion oil, approximately 1.515, minimizes light refraction and enhances both resolution and contrast. This makes it an indispensable tool for high-magnification objectives.
-
The refractive index of immersion oil closely matches that of glass, reducing light scattering.
-
High-resolution objectives rely on this refractive index match to achieve optimal image clarity.
-
Immersion oil forms a continuous optical path, allowing the lens to capture more light and improve resolution.
By using oil immersion, you can unlock the full potential of your high-magnification objectives. This technique is particularly valuable in fields like cellular biology and pathology, where precise imaging is essential for accurate analysis.
Note: Always use the type of immersion oil recommended by your microscope manufacturer to avoid compatibility issues and ensure the best results.
Benefits of Using Oil Immersion for the Best Resolution
Enhanced resolution for detailed specimen observation
Oil immersion significantly improves the resolving power of your microscope, allowing you to observe intricate specimen details that would otherwise remain hidden. The higher refractive index of immersion oil enhances light transmission, reducing scattering and increasing clarity.
Such improvement results in a 50% increase in resolving power, making it easier to distinguish fine structures such as cellular organelles or bacterial morphology.
When you use oil immersion, the microscope captures more light from the specimen, enabling high-resolution imaging. This technique is particularly valuable for applications requiring precise observations, such as studying tissue samples or identifying microorganisms.
The enhanced resolution ensures that even the smallest features of your specimen are visible, providing a deeper understanding of its composition and behavior.
Improved clarity at high magnifications
High magnifications often challenge the clarity of microscope images due to light refraction and scattering. Oil immersion solves this problem by creating a seamless optical path between the slide and the objective lens. This path allows more light to enter the lens, improving both resolution and contrast. For example, when observing specimens at 1000x magnification, oil immersion ensures that fine details remain sharp and well-defined.
Without oil, the air gap between the slide and the lens causes significant light loss, leading to blurry or distorted images. By using immersion oil, you eliminate this gap and achieve the clarity needed for accurate analysis.
The improved clarity benefits various fields, from cellular biology to material science. Whether you’re examining the structure of a cell or analyzing the surface of a material, oil immersion provides the optical precision required for high-resolution imaging.
Applications in research, education, and clinical settings
Oil immersion plays a vital role in advancing microscopy across multiple fields. Its ability to enhance resolution and clarity makes it indispensable for research, education, and clinical applications.
|
Application Area |
Description |
|---|---|
|
Biological Microscopy |
Essential for medical research and diagnostics, enhancing resolution for studying cellular structures. |
|
Industrial Microscopy |
Used in quality control and material characterization, providing necessary optical clarity. |
|
Educational Microscopy |
Facilitates high-resolution imaging in educational settings, enhancing student understanding of science. |
In research, oil immersion helps scientists study cellular structures and processes with unparalleled detail. This technique is crucial for understanding diseases, developing treatments, and advancing medical knowledge. In industrial settings, it ensures accurate material characterization, aiding in quality control and product development. For educators, oil immersion provides students with clear and detailed images, fostering a deeper appreciation for science and microscopy.
The versatility of oil immersion makes it a valuable tool for anyone working with high-resolution microscopy. Its ability to reveal fine details and improve clarity ensures that you can achieve the best possible results, regardless of your field of study or application. Oil immersion is a game-changer for achieving the best resolution in microscopy. It enhances image clarity by reducing light refraction and matching the refractive index of the glass components.
This technique allows you to observe intricate specimen details with unmatched precision, making it essential for high-magnification objectives.
Practicing proper oil immersion techniques ensures optimal performance. Use high-quality immersion oil to fill the gap between the slide and lens, minimizing light bending and improving brightness. Regular maintenance, such as cleaning the lens and slide, protects your microscope and guarantees consistent results.
Start incorporating oil immersion into your microscopy routine. With practice and care, you can unlock the full potential of your microscope and achieve exceptional image quality.
FAQ
What is the best type of immersion oil to use?
Use the immersion oil recommended by your microscope manufacturer. Common types include low-viscosity oil for routine use and high-viscosity oil for extended sessions. Fluorescent-grade oils work well for fluorescence microscopy. Always check the oil’s refractive index to ensure compatibility with your objective lens.
How do I avoid air bubbles when applying immersion oil?
To prevent air bubbles, apply a small droplet of oil directly onto the slide’s cover slip. Slowly lower the objective lens into the oil without pressing too hard. If bubbles appear, gently rotate the lens to disperse them or reapply the oil carefully.
Can I reuse slides after oil immersion?
Yes, you can reuse slides if they are cleaned properly. Rinse the slide with warm water and mild detergent to remove oil residue. Dry it thoroughly before storing. For disposable slides, discard them responsibly to avoid contamination.
What should I do if the image remains blurry after using oil immersion?
Check for air bubbles, clean the objective lens and slide, and ensure proper oil application. Verify that the optical path is aligned and the condenser is correctly positioned. Adjust the focus using the fine adjustment knob for sharper details.
Is oil immersion safe for all microscope objectives?
No, only use oil immersion with objectives labeled “oil” or “oil immersion.” Using oil on dry objectives can damage the lens and compromise image quality. Always check the objective’s specifications before applying immersion oil.

